Metal Jerry Cans Plastic Fuel & Water Cans Mr Funnel LiQuiTube Tyre Sealant Pertronix Special wiring is necessary with factory installed Porsche CD ignition systems. Click on the diagram below to view the proper Ignitor wiring. Yes, most capacitive discharge boxes are compatible with the Ignitor. Special wiring instructions should be followed. Click on the appropriate diagram for complete wiring instructions. The Ignitor has no set specification in which the spark plugs should be gapped at. Every engine responds differently to spark plug settings. In most cases increasing the factory recommended gap by .005 improves the engine performance, but we cannot know all the parameters of your engine, so it is entirely your choice. Yes, the Ignitor wire length may be tailored to your specific needs. Occasionally the wires may need to be extended. We recommend that a 20-gauge copper strand wire be used. Make sure that all splices are cleaned, secure and insulated. Leaving the ignition switch on when the engine is not running can cause permanent damage to the ignition system, and related components. This does not apply to the accessory position of the ignition switch. To determine if your systems coil is compatible with the Ignitor, some measurements should be taken prior to installation of the Ignitor. Caution… While performing this test, never leave the ignition switch on for more than 30 seconds at a time. Set your voltmeter to a 15 or 20-volt scale. Attach an 18 or 20 AWG jumper wire from the negative coil terminal to an engine ground. Attach positive (red) lead of your voltmeter to the positive side of the coil, and the negative (black) lead to an engine ground. Turn the ignition switch to the run position. Now read the voltage at the positive coil terminal. Turn the ignition switch off. If the voltage measured is approximately 12 volts, no resistance wire is present. A typical resistance wire will provide 9 – 6 volts. The next step is to determine the resistance in the primary ignition. Label the wires attached to the coil terminals and note their appropriate location. Make sure that the ignition switch is off and disconnect all wires from the coil. Adjust your meter to the lowest ohm scale. If you are using an analog style meter make sure to zero the needle. Measure from the negative terminal to the positive terminal. Write your measurement down. Now the maximum system amperage can be determined. Divide your voltage measurement by your coil resistance measurement. This will give you the system current or amperage. Four and six cylinder engines should not exceed 4 amps. Eight cylinder engines should not exceed 8 amps. If the total amperage in your system is higher than the amount recommended for your application, you should install a ballast resistor. Example: Voltage 12 The first step in troubleshooting involves answering a few questions. If you answered “NO” to any of the previous questions, go back and correct the condition before proceeding. (Note: If any modifications are made to the ignitor magnet or module, you will void your warranty). Pertronix lobe sensing kits use unique lobe sensor technology, which uses the point cam to trigger, rather than a magnet sleeve or ring. The standard Hall Effect Ignitor module has the integrated circuit triggered by the cobalt magnets in the magnet sleeve or ring that is mounted on the shaft (usually on the cam lobes). Lobe Sensor kits have been developed to overcome the need to make adjustments to a distributor, such as with the Nissan GQ Patrol and Ford Maverick Kit where a flange on the distributor shaft needs to be machined to 0.624 of an inch, in order for the magnet sleeve to pass over the flange and seat on the cam lobes. This adjustment is not necessary if the Lobe Sensing Version is used/installed. This problem is NEARLY ALWAYS associated with low voltage at the unit, preventing the unit from operating correctly. The unit is actually turning off, and back on as the coil charges and releases energy. The best possible remedy for this problem is to wire the Ignitor units RED WIRE directly to a switched 12-volt source away from any voltage reduced circuit, such as a resister wire or ballast resistor. These circuits usually are in the wire from the ignition switch to the coil. The Ignitor™ lead (red wire) can go directly to the ignition switch or any other “switched” source on the fuse panel. The coil will still need a minimum of 1.5 ohms of resistance, either internally such as the Flame-Thrower or in the form of a resistor wire or ballast resistor. We think you will find when you have these “breaking up” problems, low voltage is the culprit! Our Flame-Thrower coils are designed specifically for compatibility with our Ignitor 1, 2 and 3 units. However, the Flame-Thrower 1 Coil may also be used with a point type system or any other system that calls for a 1.5 or 3.0-ohm coil. The Ignitor fits entirely inside the distributor, and in most cases installs quicker than points. There are no “black boxes” or complicated wiring. Simply remove your points and condenser (or old electronic unit) to install the kit into the distributor, attach the two wires to the appropriate positions, and you’re done. Some applications may require you to alter the distributor in some way (e.g. a flange on the distributor shaft may need to be shimmed, or a Vacuum Advance screw and or bracket may need to be filed back) which may add to the level of difficulty. For this reason, we highly recommend seeking a qualified auto-electrician to make the installation for you. Ignitor kits are available for the Automotive, Industrial, Marine and Agricultural industries. Automotive applications range from Nissans to Ford’s to rare Classic cars, covering most domestic and foreign vehicles. Our Marine applications include many popular and classic boats. Many kits are available for all types of Industrial and Agricultural equipment. Ignitor kits for 6 volt and 12 volt positive ground applications are also available. The Ignitor electronic ignition is far from being universal. Each kit is designed specifically for the distributor type. However, our kits will often fit many distributors from the same manufacturer. A kit that has been designed for a particular distributor type may also fit other distributors that use the same point set, cap and rotor. Drinking water can be stored in a Plastic Water Can for up to 6 months. Ensure the container itself is stored in a cool dark place to minimise exposure to sunlight and heat. Pro Quip Plastic Water Containers are made from food grade HDPE and are BPA Free. Whilst our Cans are tested and pass Drop Tests, Hydraulic Pressure Tests and do not leak as the “Closures must be so designed that they will remain secure and leak-proof under normal conditions of transport”, the “normal conditions of transport” state that our plastic containers with a vent closure should be stowed and restrained with the closure uppermost (ADG Code Section 8.1.2.7), therefore, upright. The bayonet closure of our Steel cans allows them to be transported in any orientation. According to the EPA’s Toxicity Characteristic Leaching Procedure analysis, LiQuiTube is not even remotely close to being considered a hazardous material or a hazardous waste product. As such, LiQuiTube can be rinsed down any sanitary sewer, with the permission of the sewer owner. Yes. LiQuiTube will usually save in tyre repair and down time, many times over what you would pay in any given tyre repair. No. LiQuiTube permanently coats all internal surfaces of the tyre and wheel and stays in place for permanent protection. Yes. Water vapour can be injected into a tyre from unfiltered air compressors, or through major leaks in the bead area of a tyre that is already flat. LiQuiTube does have a water dispersing agent in its formulation. However, if excess water is in the tyre it will dilute the sealant and make it ineffective. The best way to ensure water is not being injected into tyres, is to empty (bleed) the air line of the compressor by blowing air through the line before attaching it to the valve stem of the tyre. If white liquid is noticed leaking from a puncture after the tyre has been rotated several times, and air is continuing to leak out of the tyre, more than likely the tyre has had water or some other type of sealant or ballast in it previous to the LiQuiTube treatment. If this happens, you must remove the tyre from the rim, rinse it out with water, let it dry, remount it, and retreat with LiQuiTube. NO. LiQuiTube has four rust inhibitors in it and one vapour lock inhibitor. It is chemically inert and will not have any effect on the rubber or wheel. LiQuiTube stays pH neutral for the life of the tyre. NO. LiQuiTube has no flash point. Indefinite! We have tested LiQuiTube that has been in closed containers for more than 8 years and the chemical make up of LiQuiTube is identical to when it was bottled. With water. LiQuiTube is 100% water soluble and can be rinsed out of the inside of the tyre with a garden hose. For quick removal use a wet dry vac after introducing the water into the inside of the tyre. If the puncture is too large and requires a regular patch, simply blow the LiQuiTube away from the puncture area with a high pressure air hose, wipe area with a wet rag, let dry and patch normally. Once. In some extreme conditions such as industrial mowers that are getting several thousand punctures in thorn rows and ditches, additional LiQuiTube may at some point be required. However, LiQuiTube is usually 100% of the time, a one time application. Yes. LiQuiTube stays effective from -42˚ to 93˚C. Yes. It may take a few days for LiQuiTube to seek out all the areas of air loss on a rim and bead. You may need to add air a few more times until the leak is permanently sealed. Once the leaks have all been sealed, you should never have to add air to the tyre again. The more the tyre is used, the less time it will take for a bead leak to seal. LiQuiTube will seal punctures of 6mm in any air-filled tyre. Larger punctures in the tread area will generally seal in higher ply industrial type tyres. In independent tests LiQuiTube has sealed 20mm punctures in a single 14 ply truck tyre, and the tyre was still in active use after the punctures. Numerous users of heavy mining and earth moving equipment have reported tyres with puncturing objects over 2.5cm in diameter being sealed with LiQuiTube. Yes. High speed, low speed, tubeless, or tube type tyres. If you put air into a tyre, LiQuiTube can be used effectively. Since LiQuiTube is totally water soluble it is not effective with liquid ballasts such as calcium chloride. Also, LiQuiTube cannot be used with balancing powder. However, trucking companies have found that LiQuiTube treatment in heavy duty truck tyres eliminates the need for a balancing powder. NO! Most tyre sealants have very few ingredients in them. LiQuiTube is a heat treated formula that is made up of 23 different ingredients. LiQuiTube is heat treated to get a cross-linking of the molecules of all the ingredients, making a 100% totally homogeneous formula that coats all inner surfaces of a tyre evenly, and never has to be shaken, stirred, or mixed and will never break down in the bottle or the tyre. Absolutely, in these 5 ways! Time studies have shown that if only 24%-30% of flat tyres and air loss are eliminated, LiquiTube has paid for itself. LiquiTube will eliminate over 90% of flat tyre problems in tubeless tyres, and around 65% in tube type tyres. LiquiTube can usually be installed in any tyre for less than it would cost to repair that tyre one time. LiquiTube continues to work and be effective for the life of the tyre. The added benefits of maximising tyre life and fuel efficiency, by keeping tyres at the correct inflation all the time for the entire life of the tyre, makes it possible for LiquiTube to save users over 10 times what the sealant costs. LiQuiTube completely coats all interior surfaces of the tyre and rim including the sidewall to prevent all forms of air loss including rim and bead leaks, as well as large punctures in the tread area. The coating on the sidewalls on the inside of the tyre eliminates air loss from porosity leaks, and weather cracking. LiQuiTube can be installed through a valve stem with the valve core removed. The 1L bottle includes a tube and valve core remover under the cap for easy “hand squeeze” installation. The bottle also includes volume indicators on the label to allow for precise measurements. The 4L hand pump bottle includes a manual hand press pump which delivers 30ml of LiQuiTube through the valve stem (without core) with each pump. The 20L Pail should be used with either the 20L pump part 2626, or by being decanted into the smaller bottles and squeezed or pumped in with them. The 20L pail pump is a two stage pump with adjustable stroke volume so that anywhere from 30ml to 250ml can be delivered with each complete stroke. Please consult the tyre application guide for exact amounts required per tyre Here. If you have any questions or cannot find your tyre size please call or contact us via the website. One of our friendly staff will assist. LiQuiTube can be washed out from a tyre and off a rim with a high pressure hose as it is water soluble. LiQuiTube is perfect for use with re-tread tyres. No. LiQuiTube is a chemically inert substance with rust inhibiters in the mixture. LiQuiTube will not react to the metal of rims or the rubber inside a tyre. LiQuiTube forms an “inner tube” in any air filled tyre as the tyre rotates while moving. The internal pressure of the tyre pushes LiQuiTube into any leaks and forms a permanent seal for the life of the tyre. LiQuiTube will seal punctures up to 6mm in standard tyres and up to 20mm in heavy ply tyres. LiQuiTube is less effective in tubed tyres as the inner tube may slip and re-open a puncture, so some pressure would be lost before the LiQuiTube seals the hole again. If you have found the tap supplied with your Pro Quip Heavy Duty Water Can is not fitting correctly into the thread on the can, then we have the solution. The most likely cause may be the seal interfering with the thread before it gets round to its correct position facing downwards. The solution is to rotate the seal found on the tap so that it forms a taper towards the thread on the tap. The seal can be removed carefully by rolling with your thumb and using a blunt edge (like a flat head screw driver or butter knife) to pry the seal from its seated position. Now place the seal so that the section that was facing outwards from the tap is now facing the plastic flange (towards the spigot rather than the thread of the tap) and re-seat the seal. The seal should now taper towards the thread of the tap which will stop it from interfering with the container thread at the wrong position. Thread the tap back into position and you should find it now ends at the correct 6 o’clock position and sits firm for use with a single hand. We have now made a small modification to the tooling to better allow the variations found in the seal, and ensure a perfect experience with the tap for every Heavy Duty Water Can we make. Remember, if you have any problems or concerns at all with our products, you are encouraged to lets us know by calling or contacting us through the website contact information page. As a proud Australian company with Australian made products, we are always looking to improve and your consumer feedback is very important. It is not recommended that any additives be put through with fuel into the Mr Funnel Filter. Additives may strip the coating from the filter mesh and render it ineffective. If additives must be used, add to tank after filtering fuel through Mr Funnel. We recommend you test the Fuel Filter Funnel before each use. Add enough water to the funnel to cover the bottom 1/3 of the filter. This amount of water should not pass through the filter and proves it is working as designed. More than this amount will cause water to pass through the filter due to the additional head pressure caused by the mass of the excess water. If most of the filter is covered with water, the head pressure of a full funnel can force water through the filter. During proper use; as water is observed collecting in the bottom of the funnel, or the flow rate begins to slow, stop refueling and dump the water/dirt out of the funnel and then continue. The conductive (Black model) Mr. Funnel Fuel Filter Funnels contain carbon injected into the raw materials allowing the funnel to conduct static electricity. Grounding is an important safety feature when handling fuel in marine and aviation applications. Please consult the owners manual of equipment to be filled for proper grounding instructions. No! The fluoropolymer stainless steel mesh in the Mr Funnel is designed to never need replacing. Even wiping the filter is not recommended as loose fibres may block the mesh causing the flow rate to slow. A simple tap on the concrete is all that is needed to loosen any contaminants and being a non stick surface, the filter will wash free as it is used with more fuel. There is no need to back-flow the filter. Yes! The F15C is the perfect size to use as its 45Lpm flow rate can easily cope with diesel and unleaded bowser speeds. Please note however that the flow rate on Hi-Flow diesel pumps is too great for even the F15C, so is not recommended for use with them. Smaller model Mr Funnels are best used with Jerry Cans and for smaller capacity fuel tank applications. The Mr. Funnel Fuel Filter Funnel is designed to remove water, dirt and debris from unleaded fuel, diesel, two-stroke mixes, kerosene and aviation fuels. Mr Funnel is a fuel filter funnel that separates free water, dirt, debris and dust down to 74 micron from hydrocarbon fuels. Free water is the collection of H2O molecules in the bottom of fuel cans or drums, formed when fuel is stored for any amount of time. Free water forms due to condensation in the air and/or the separation of water molecules from fuel. As fuel is poured into the Mr Funnel, free water, dirt dust and other contaminants are prevented from passing through the filter mesh and are collected in the sump area at the bottom of the funnel. Simply discard these contents and allow the funnel to dry. There is no need to wipe or replace the filter at any time. Don’t fear, it is just the fuel resistant enamel lining. The lining is a reddish-brown colour when set and covers the entirety of the inside of the Can. This is one of the many high quality characteristics of the Pro Quip Metal Jerry Can Range that sets it apart from the cheap options on the market. You many notice upon first opening of the can that it has a certain smell which is a result of this lining being used. Corrosion of steel is an orange-brown colour. No, the cheaper designs of Jerry Can use a breather tube welded inside the Can neck which is not compatible with Pro Quip Pourers. Pro Quip Pourers use a specially shaped Breathing Tongue which fits perfectly into the Breathing Channel which is unique to Pro Quip Metal Jerry Cans. The best way to store a Water Can is completely dry. Once you have finished using the can, give it a rinse with warm water and bicarb soda. For general purpose cleaning the ratio is normally 1 tablespoon per 500ml. Shake the solution around the inside of the can to ensure it reaches all areas and leave it to sit with the caps in place but loose for a minimum of 30 minutes. Pour out the solution then rinse again with water and leave it to dry upside down with all caps open in a well ventilated area. It may take some time to dry properly however you can speed up the process with paper towel on the end of rod of some sort to reach the corners of the Can. The bicarb will help prevent mould growth and remove and smells that arise from any leftover water that was left in the can. When the can is completely dry on the inside, you can store it with the caps closed finger tight. You may find that ambient temperature changes will allow the can to expand and contract should there be any extreme differences during the night or day. This is a natural property of HDPE plastic and is far more pronounced when fuel is stored. The tooling and manufacture process we use for our Water Cans is the same as those that go into producing our Fuel Cans, so the structure of the Can will easily handle these expansion changes. Fortunately all of our Waters Cans are produced with the breather cap on the back which can be slightly loosened to allow equalisation of pressure while limiting the potential exposure of the inside of the can to external contaminants. We recommend always filtering fuel when pouring from a Fuel Can to limit the potential for any contaminants from reaching your fuel tank. If you use a jerry can holder, make sure it has rubber buffers so your paint does not get scratched. Deep scratches in your paint increase the risk of rust developing. Pourers that have not been made by Pro Quip will use general dimensions to try fit most Can Necks on the market however they don’t account for the Pro Quip Breathing Channel Plate. Even if you make it fit, the Pro Quip Breathing Channel won’t be utilised as it is unique to our design. The result will be a sluggish, glugging pour. Pro Quip Pourers are specially designed and made to fit Pro Quip Metal Jerry Cans. Their size, shape and breathing ability have all been manufactured in Europe to spec to allow Pro Quip Metal Jerry Cans to pour in a controlled and consistent manor without any glugging. The Flexible Pro Quip Pourers also include a filter mesh to prevent contaminants from entering your fuel tank. If your Pro Quip Metal Jerry Can is showing signs of vapour or liquid loss, there are two possible explanations: There are benefits to both types, and some important points to consider based on what you plan to do with them. Plastic cans offer great scratch resistance and can be used in general fuel storage and marine applications due to the HDPE plastic construction. Plastic cans are lighter than steel though don’t let that fool you; when filled to nominal capacity the 20L versions still weigh over 16kg with Unleaded and over 18kg with Diesel. Check out the Pro Quip Fuel Can Select System further weight and pouring information of other options in the range. Plastic cans are also cheaper to purchase while also including a pourer, however the Australian Dangerous Goods Code recommends that HDPE fuel containers be replaced after 5 years of use. Plastic cans should always be stored upright and secured during travel. HDPE plastic will always swell and contract from changes in ambient temperature if their pressure hasn’t been manually equalised with the vent cap which can make them more difficult to remove from holders. Pro Quip Metal Jerry Cans offer a longer term option with well looked after cans lasting over 20 years (from personal experience). The internal fuel resistant enamel prevents internal rust from condensation. Both Super Cans and Traditional Style Jerry Cans are able to be stored in any orientation which is easier for travel. The weight when full of a Pro Quip Metal Jerry Can will be 19kg for Unleaded and 21kg for Diesel. If lifting weight is an issue but metal is still the preference, consider smaller sizes such as the 10L and 5L variations. There is very little noticeable expansion and contraction due to changes in ambient temperature with Pro Quip Metal Jerry Cans due to the 0.9mm Steel used. The colour of Pro Quip Plastic and Metal Jerry Cans is for identification purposes only. There is no difference in the plastic used in the plastic versions, or the enamel used in the metal versions between colours. No, the inner enamel based lining is suitable for fuel but not water as it is not food grade. Yes, the upright design of both 15L and 20L Pro Quip Plastic Fuel and Water Cans are suitable for traditional jerry can holders that fit metal varieties. The Can Caddy Fuel Can Transport Tray and stabilisers can be used for Pro Quip 5 and 10L Plastic and Metal Jerry Cans. All replacement parts are available either directly through Pro Quip or at one of the leading retailers who stock our products on an everyday basis. Click on the particular part you need to find out where, or alternatively get in touch with us directly. Please bear in mind that not all stores in some retail chains will stock every product in our range. The most common cause of a Pro Quip Plastic Fuel Can leaking when being stored or poured is because the seal is not seated in its correct position. The “C” Seal is used to allow components to be stored inside the can during transport and storage. This seal should always be positioned over the flange or shoulder of the pourer, allowing it to seal against the neck of the can and the cap (when pouring) or stopper (when storing). Check out our “How to” section in the Info Hub for the proper assembly of these parts. Components should only be closed to finger tightness. This decreases the chance of compressing, pinching or tearing the seal underneath which can cause a leak.
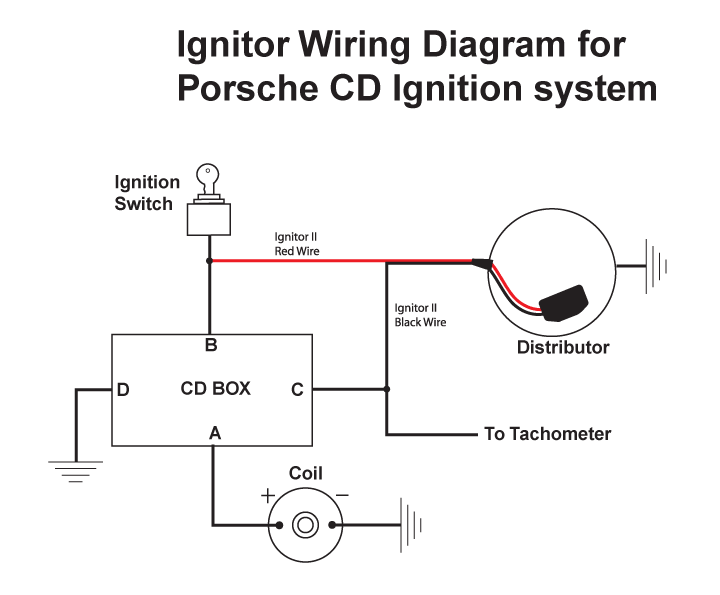
How do I wire the ignitor or ignitor II ignition system to my Porsche CD ignition box?
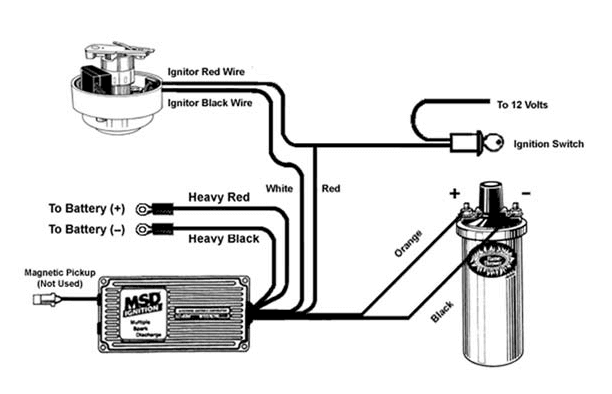
Can I run a MSD box or other capacitive discharge unit with the ignitor? How do I hook it up?

What should I gap the spark plugs to?
Can I change the length of the ignitor wires?
Due to high demand, we now have our own wire extension kit which comes with ultra-high grade flexible automotive wire, and all connectors required for a fast install. (Part No. 6213)What will happen if I leave the ignition switch on when the engine is not running?
What type of col can I use with the ignitor? How do I check my coil’s resistance? (12V negative ground only)
Resistance 1.5
12 / 1.5 = 8
Total amperage is 8Since I have installed the ignitor the engine won’t start. What can I check?
If the answer to these questions is “YES”, then review some additional common solutions to a no start condition.
What is the difference between lobe sensor and hall effect kits?
My vehicle is misfiring or breaking down under load. What should I do?
We also highly recommend seeking a qualified auto-electrician to make this adjustment for you.
For more information on how to Test Voltage and Resistance, see this info sheet.What applications are covered with the PerTronix Flame-Thrower Coils?
How difficult is it to install an ignitor?
What type of applications can the ignitor be used in?
Is the Ignitor a “Universal” Electronic ignition conversion?
How long can I store drinking water in a Plastic Can?
Proper Care for Metal Jerry Cans
Can I store Pro Quip Plastic Fuel Cans on their side?
How do you dispose of LiQuiTube when it is rinsed out of the tyre? Is it a hazardous material, or hazardous waste product?
Will LiQuiTube treatment save on truck tyre repair?
Does LiQuiTube migrate to the bottom of the tyre when the vehicle is stopped?
Can excess water inside a tyre dilute the sealant and make it ineffective?
Will LiQuiTube rust or corrode a wheel or rim?
Is LiQuiTube flammable or explosive?
What is the shelf life of LiQuiTube?
How do you remove LiQuiTube from the tyre when the tyre needs recapping or a section patched?
How often do you have to treat a tyre with LiQuiTube?
Is LiQuiTube effective in extreme temperatures?
Will LiQuiTube seal bead or rim leaks?
How large a puncture will LiQuiTube seal?
Can LiQuiTube be used in any air-filled tyre?
Aren’t all tyre sealants basically the same?
Does LiQuiTube pay for itself?
Is LiQuiTube cost effective?
What problem does LiQuiTube prevent?
How is LiQuiTube installed in a tyre?
How much LiQuiTube do I need in my tyre?
How is LiQuiTube removed from a tyre once it has lost all of its tread?
Will LiQuiTube damage my tyre or rim?
How does LiQuiTube work?
Tap supplied with your Pro Quip Heavy Duty Water Can is not fitting correctly
Ensuring Your Tap Fits Perfect

Can I use additives in my fuel without affecting the Mr Funnel Filter?
How can I test a Mr Funnel to know that it works?
What is the difference between conductive and non-conductive models?
Do I need to replace the filter in a Mr Funnel?
Can I use Mr Funnel at a Bowser?
What liquids can be filtered by Mr Funnel Fuel Filter Funnels?
How does the Mr Funnel Work?
The inside of my brand new Pro Quip Metal Jerry Can looks like a reddish-brown colour. Is this rust or just the lining?
Do Pro Quip Pourers fit other brands of Metal Jerry Can?
Storing your Water Can when it’s not in use
Should I filter my fuel when pouring from a Fuel Can?
Metal Fuel Can – Holder
I have a Pourer that is not made by Pro Quip, will it work?
Metal Jerry Can – Lid Not Not Sealing
Plastic or Metal Jerry Can, which should I choose?
Can I use Unleaded Fuel in Diesel Cans and vice versa?
Are Pro Quip Metal Jerry Cans OK for use with water?
Do 20L Pro Quip Plastic Fuel and Water Cans fit holders?
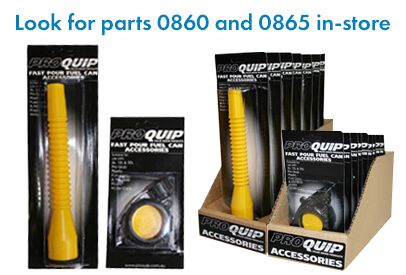
Can I buy replacement parts for my Pro Quip Can?
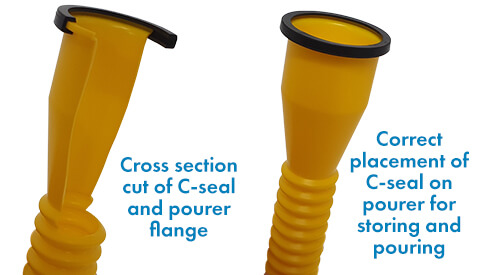
My Pro Quip Plastic Fuel Can is leaking when being poured or stored, why?
How tight do I need to close the components on my fuel can?
Shopping Cart