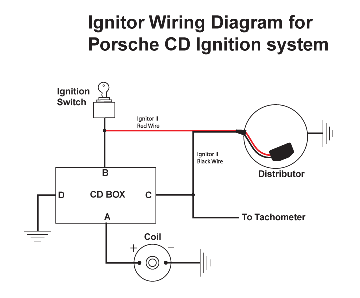
How do I wire the ignitor or ignitor II ignition system to my Porsche CD ignition box?
 Wire to Porsche CD Ignition Box
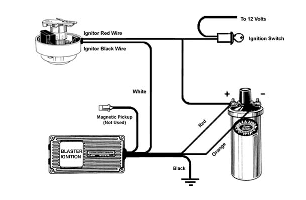
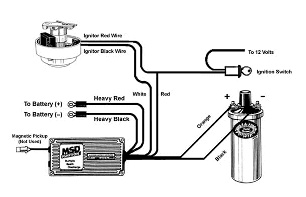
Can I run a MSD box or other capacitive discharge unit with the ignitor? How do I hook it up?
What should I gap the spark plugs to?
The Ignitor has no set specification in which the spark plugs should be gapped at. Every engine responds differently to spark plug settings. In most cases increasing the factory recommended gap by .005 improves the engine performance, but we cannot know all the parameters of your engine, so it is entirely your choice.
Can I change the length of the ignitor wires?
Yes, the Ignitor wire length may be tailored to your specific needs. Occasionally the wires may need to be extended. We recommend that a 20-gauge copper strand wire be used. Make sure that all splices are cleaned, secure and insulated.
Due to high demand, we now have our own wire extension kit which comes with ultra-high grade flexible automotive wire, and all connectors required for a fast install. (Part No. 6213)
What will happen if I leave the ignition switch on when the engine is not running?
Leaving the ignition switch on when the engine is not running can cause permanent damage to the ignition system, and related components. This does not apply to the accessory position of the ignition switch.
What type of col can I use with the ignitor? How do I check my coil’s resistance? (12V negative ground only)
To determine if your systems coil is compatible with the Ignitor, some measurements should be taken prior to installation of the Ignitor. Caution… While performing this test, never leave the ignition switch on for more than 30 seconds at a time.
Set your voltmeter to a 15 or 20-volt scale. Attach an 18 or 20 AWG jumper wire from the negative coil terminal to an engine ground. Attach positive (red) lead of your voltmeter to the positive side of the coil, and the negative (black) lead to an engine ground. Turn the ignition switch to the run position. Now read the voltage at the positive coil terminal. Turn the ignition switch off. If the voltage measured is approximately 12 volts, no resistance wire is present. A typical resistance wire will provide 9 – 6 volts.
The next step is to determine the resistance in the primary ignition. Label the wires attached to the coil terminals and note their appropriate location. Make sure that the ignition switch is off and disconnect all wires from the coil. Adjust your meter to the lowest ohm scale. If you are using an analog style meter make sure to zero the needle.
Measure from the negative terminal to the positive terminal. Write your measurement down.
Now the maximum system amperage can be determined. Divide your voltage measurement by your coil resistance measurement. This will give you the system current or amperage.
Four and six cylinder engines should not exceed 4 amps. Eight cylinder engines should not exceed 8 amps. If the total amperage in your system is higher than the amount recommended for your application, you should install a ballast resistor.
Example:
Voltage 12
Resistance 1.5
12 / 1.5 = 8
Total amperage is 8
Since I have installed the ignitor the engine won’t start. What can I check?
The first step in troubleshooting involves answering a few questions.
- Do you have the correct kit for your application?
- Did the Ignitor install without any modification?
- Was the Ignitor installed according to the instructions?
- Did the engine run prior to the installation of the Ignitor?
If you answered “NO” to any of the previous questions, go back and correct the condition before proceeding. (Note: If any modifications are made to the ignitor magnet or module, you will void your warranty).
If the answer to these questions is “YES”, then review some additional common solutions to a no start condition.
- The position in which the Ignitor red wire is attached to is not supplying sufficient voltage. (See ‘Misfiring’ point above for ‘Voltage Testing’ tips)
- The air gap between the module and magnet sleeve is too great.
- The ground wire inside the distributor is not connected.
- The wire connections are not tight.
- The polarity is not correct.
What is the difference between lobe sensor and hall effect kits?
Pertronix lobe sensing kits use unique lobe sensor technology, which uses the point cam to trigger, rather than a magnet sleeve or ring. The standard Hall Effect Ignitor module has the integrated circuit triggered by the cobalt magnets in the magnet sleeve or ring that is mounted on the shaft (usually on the cam lobes). Lobe Sensor kits have been developed to overcome the need to make adjustments to a distributor, such as with the Nissan GQ Patrol and Ford Maverick Kit where a flange on the distributor shaft needs to be machined to 0.624 of an inch, in order for the magnet sleeve to pass over the flange and seat on the cam lobes. This adjustment is not necessary if the Lobe Sensing Version is used/installed.
My vehicle is misfiring or breaking down under load. What should I do?
This problem is NEARLY ALWAYS associated with low voltage at the unit, preventing the unit from operating correctly. The unit is actually turning off, and back on as the coil charges and releases energy. The best possible remedy for this problem is to wire the Ignitor units RED WIRE directly to a switched 12-volt source away from any voltage reduced circuit, such as a resister wire or ballast resistor. These circuits usually are in the wire from the ignition switch to the coil. The Ignitor™ lead (red wire) can go directly to the ignition switch or any other “switched” source on the fuse panel. The coil will still need a minimum of 1.5 ohms of resistance, either internally such as the Flame-Thrower or in the form of a resistor wire or ballast resistor. We think you will find when you have these “breaking up” problems, low voltage is the culprit!
We also highly recommend seeking a qualified auto-electrician to make this adjustment for you.
For more information on how to Test Voltage and Resistance, see this info sheet.
What applications are covered with the PerTronix Flame-Thrower Coils?
Our Flame-Thrower coils are designed specifically for compatibility with our Ignitor 1, 2 and 3 units. However, the Flame-Thrower 1 Coil may also be used with a point type system or any other system that calls for a 1.5 or 3.0-ohm coil.
How difficult is it to install an ignitor?
The Ignitor fits entirely inside the distributor, and in most cases installs quicker than points. There are no “black boxes” or complicated wiring. Simply remove your points and condenser (or old electronic unit) to install the kit into the distributor, attach the two wires to the appropriate positions, and you’re done. Some applications may require you to alter the distributor in some way (e.g. a flange on the distributor shaft may need to be shimmed, or a Vacuum Advance screw and or bracket may need to be filed back) which may add to the level of difficulty. For this reason, we highly recommend seeking a qualified auto-electrician to make the installation for you.
What type of applications can the ignitor be used in?
Ignitor kits are available for the Automotive, Industrial, Marine and Agricultural industries. Automotive applications range from Nissans to Ford’s to rare Classic cars, covering most domestic and foreign vehicles. Our Marine applications include many popular and classic boats. Many kits are available for all types of Industrial and Agricultural equipment. Ignitor kits for 6 volt and 12 volt positive ground applications are also available.
Is the Ignitor a “Universal” Electronic ignition conversion?
The Ignitor electronic ignition is far from being universal. Each kit is designed specifically for the distributor type. However, our kits will often fit many distributors from the same manufacturer. A kit that has been designed for a particular distributor type may also fit other distributors that use the same point set, cap and rotor.


